In part I, I explained how I’m attempting to write a webapp that can solve simple Sudoku puzzles. Since then, I’ve made some progress. This series will track what I’ve been working on, learning, and any difficulties I’m encountering.
With a goal in mind, it was time to just dive in and go.
Step 1: Oh God, what is this even…
At first, it was kind of overwhelming. Where do I even start? How the heck am I going to even tackle any of this?
After learning the basics of Javascript loops, functions, arrays, and objects, thanks to Codecademy, I was mostly ready to go. What was my real first step? How the heck do I even manipulate data on a webpage, let alone collect and analyze it?
After a few tries, I had a simple project featuring a table (with cells individually labeled) up and running!

After some more tinkering, I was able to get the “Generate Numbers!” button to actually randomly generate the numbers 1 through 9 and fill in the cells without repeating any numbers. Sweet!

Hey, that’s kind of cool. Now we’re getting somewhere! I think I was ready to take it to the next level.
Step 2: Okay… I guess we need to make a fake Sudoku grid.
There’s probably simpler ways to go about doing this, but I ended up spending a lot of time figuring out how to build a Sudoku grid in the first place. Hey, I wanted this project to look somewhat presentable when I showed it off and (hopefully) finished it.
HTML tables were driving me crazy, so I just straight up stole this helpful thing after Googling for an answer. It looks pretty good. Pretty, pretty, pretty good.

“Wow, sir. That looks so good that I’d like to take two!”
Alright, one mission accomplished. Now onto another mission. How do I completely fill out the entire grid? I started with this, because I wanted to understand how to try to isolate certain sections of the Sudoku grid and see if I could create a series of non-duplicated random numbers.
Why did I start with randomly generating numbers? I initially thought I would just try to brute force solve some simple beginner’s level puzzles, but I later realized how ridiculous this would be. There’s a ridiculous number of possible permutations to try.
For now though, I decided to start filling out random numbers by row. This is what my initial code looked like.
[javascript]
function fillTable(row) {
for (var i = 1; i <= maxColumns; i++) {
var selectCell = row + i;
//console.log(selectCell);
document.getElementById(selectCell).innerHTML = fillCell(selectCell);
if (i == maxColumns && row != maxRow) {
i = 0;
row = nextChar(row);
} else if (i == maxColumns && row == maxRow) {
break;
}
}
}
[/javascript]
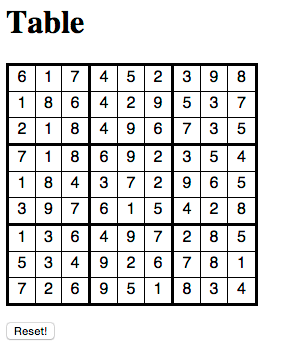
Did it work? Yes! I ended up with grid of random numbers filled out! Sure, there’s really no rhyme or reason for where numbers ended up, but it certainly looks like a completed Sudoku puzzle, right?
Step 3: Let’s put some real numbers in there
Alright, entering a bunch of random numbers into a grid is pretty fun for all of 5 minutes. (To be honest, it was pretty fun) But to take this to the next level, I really needed to have the beginning of a Sudoku puzzle in there.
A few quick Google searches later, and I found a suitable candidate! One thing I decided early on was to store all this data in an object — mostly so I could easily update it with different puzzles later on. It ended up looking like this.
[javascript]
var allCells = {
a1: "", a2: 1, a3: "", a4: 6, a5: "", a6: 4, a7: 3, a8: "", a9: 7,
b1: 3, b2: 5, b3: 6, b4: "", b5: "", b6: "", b7: "", b8: "", b9: "",
c1: "", c2: "", c3: "", c4: "", c5: 5, c6: 3, c7: 6, c8: 9, c9: "",
d1: "", d2: 8, d3: 3, d4: 2, d5: 6, d6: "", d7: 4, d8: "", d9: 9,
e1: "", e2: "", e3: "", e4: "", e5: "", e6: "", e7: "", e8: "", e9: "",
f1: 4, f2: "", f3: 5, f4: "", f5: 7, f6: 8, f7: 2, f8: 6, f9: "",
g1: "", g2: "", g3: "", g4: "", g5: "", g6: "", g7: "", g8: "", g9: "",
h1: "", h2: "", h3: "", h4: "", h5: "", h6: "", h7: 7, h8: 2, h9: 4,
i1: 7, i2: "", i3: 9, i4: 4, i5: "", i6: 2, i7: "", i8: 8, i9: ""
};
[/javascript]
On top of this, I wanted to easily differentiate the initial numbers that were created on a brand new board (so I could easily see what my script was generating, versus what was already in place on the board). I wrote a function to modify the DOM and change the font weight and background color of the starting cells.
[javascript]
function setupBoard(row) {
var row = row;
var cellValue = 0;
for (i = 0; i < maxColumns; i++) {
//console.log("ROW: " + row + (i+1));
cellValue = allCells[row+(i+1)];
document.getElementById(row + (i+1)).innerHTML = allCells[row+(i+1)];
// Just highlighting what cells we initially started with.
if (Number(cellValue) > 0) {
document.getElementById(row + (i+1)).style.fontWeight = "bold";
document.getElementById(row + (i+1)).style.backgroundColor = "#F2F2F2";
} else {
// Use this to count up total number of empty cells that we need to solve for
// The idea is that we can use this to detect if we’re stuck
emptyCells++;
}
}
}
[/javascript]
You’ll notice I have a lot of console.log() calls commented out. I liberally used these all over the place so I could make sure things were working correctly. Anyway, once all that was said and done, it ended up generating a board that looked like this.

Wow, we’re starting to chug along pretty nicely! Next time, I’ll talk about the million different functions I created in trying to solve this.


